Share the same Mac with multiple users? When your family members or co-workers often need to use your Mac, you are suggested to create an account for each person so they can personalize the settings and options without affecting the others. Different users can have their own preferences for how the system looks, and their own Home folder, iTunes library, Safari bookmarks, iPhoto library, Address Book, etc. Meanwhile, as an administrator, you can create a guest account for an occasional user to use without having access to other users’ files and settings, and you can create a group to allow multiple users to have the same access privileges for files/folders.
This post will guide you through how to set up users accounts and groups on Mac. First of all, you need to be logged in as the administrator to perform the following tasks (the administrator account is the one you use to first set up your Mac).
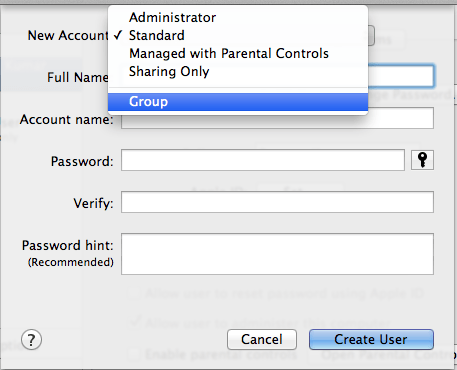
There are five types of users available to choose from, and each of them has different privileges. To add a user account on your Mac, do the following simple steps:
If you are not clear what each account type means, click the Help button in the lower-left corner of the New Account to get more information. Depending on the account type you create, you will be prompted to do different operations afterward.
As the account is created successfully, a new Home folder will be created with the short name of the account and a random user icon which you can change as desired.
Then how to create a group and add multiple users in it? Here’s the simple steps:
To delete a user account or group, you just need to select the user/group, and click on the minus (-) button below. Your will be prompted to whether save or remove the user’s home folder. Make your own decision and click OK to perform the deletion.
After you set up the user account and group, don’t forget to click the Lock icon in the Accounts preferences pane to prevent others from making changes there.
Have you got the trick now? Feel free to leave your comment or suggestion right here.

Copyright © 2026 HowtoRemoveApp.com


 HOME
HOME
Comments
Leave a reply